Using marks:
Waypoints
Tracks
Routes
Areas
Images
Scales
Mark properties
An area is a mark that defines a rectangle displayed on a map; it can be used to create an image from a map (which can be much larger than a screenshot) or to save a subsection of the map (for example for a smartphone with limited storage capacity). An area can have adjustable proportions, or you can preserve its aspect ratio.
To create an area, you can:
- select the Marks → Add new area within view menu item
- right-click on the map and select Add new area within view on the pop-up menu
- press the ‘a’ key.
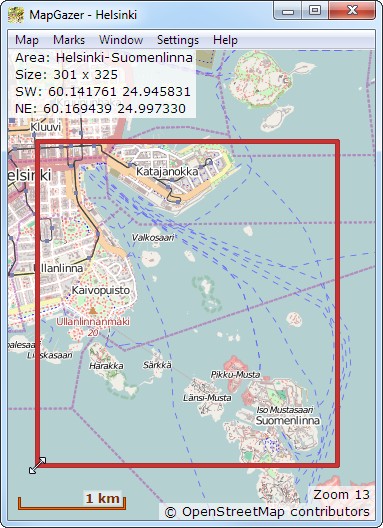
Any of these will show the border of the new area within the current window; you can then left-click on any edge or corner of the border and drag it to adjust the area covered. The size of the area in pels (image pixels) and the coordinates of its SW and NE corners will be shown at top-left of the map when the cursor is over, or dragging, the border of the area (you can turn these off using the Settings → Status display → Show area coordinates menu item).
An area is not affected by zooming, so you can zoom in to position it accurately. You can also open one or more extra windows (press ‘v’) and then use those windows to zoom in on different edges or corners of the area.
You can also create an area at the bounds of the current layer (if it has data) by selecting the Marks → Add new area at layer bounds menu item. This creates an area at the bounds of the current map layer. You can also select the Marks → Add new area at map bounds menu item to create an area at the bounds of the map; this uses the layer that has the most data (information). In either case the area is given the same name as the map, suffixed with an underscore and the zoom level of the layer used. Note that some maps have irregular (non-rectangular) boundaries so parts of the map within the bounds could be missing.
You can preserve the aspect ratio of an area at any time by selecting Preserve aspect ratio in the pop-up menu or in the Properties dialog; this ratio will then be preserved as you drag an edge or corner, and will be saved if written to a GPX file.
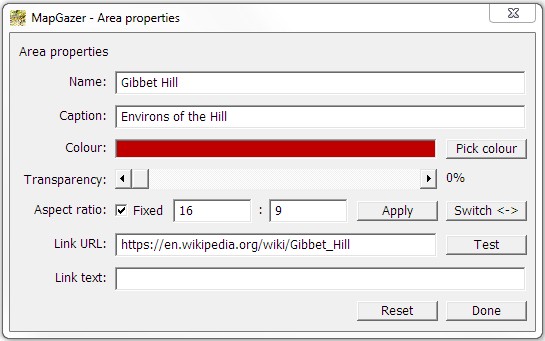
You can change the properties (name, colour, link URL, etc.) of an area by right-clicking on the area and selecting Area properties; for more details, see Mark properties. You can change the displayed width of areas and other marks using Settings → Line widths.
To change the properties (name, colour, aspect ratio, link URL, etc.) of an area, right-click on the area border and select the Area properties menu item; for more details, see Mark properties. You can change the displayed width of area borders and other marks using Settings → Line widths.
At any time you can view the area’s coordinates, and copy details to the clipboard for use by another application, by right-clicking on the area border and choosing the Area details menu item.
To change the format used for Latitude and Longitude, select Settings → Position formats on the menu bar; see the General settings page for details.
To create an image from a map, create an area then select Save area as image from the pop-up menu displayed by right-clicking on the area border. This will display a save dialog which lets you select the folder and enter the name for the new image.
Images include visible marks, and any scales, and are saved in either .jpg (JPEG, the default) or .png (Portable Network Graphics) format; after the image is saved it will be opened (using the current viewer for the image type selected) so you can check it, save it in a different format, print it, etc.
If saved as a .jpg file, the position (and elevation, if known) of the centre of the area will be included in the file.
You can inspect the dimensions of an area in pels (image pixels) at the current zoom using the Details dialog (see above), and they are also shown by default in the status information.
To save a subsection of the map, create an area then select Save area as map from the pop-up menu. This will display a dialog showing a folder tree (usually including the parent of the current map). You should normally enter a new name for a New Folder into which the map will be saved, then press OK. The map save takes place in the background and a Progress dialog showing its progress will be shown; this can take some time if the area is large.
The map save copies at least the tiles from the source map that overlap or are within the designated area. All layers in the source map that have tiles in the area will also appear in the saved map (the area saved is not zoom-dependent).
The target folder (map) may already have data. In this case the target map must be compatible (that is, have the same number of tiles per file). If both source and target contain the same tile then the source tile is used (written), using the source tile’s format (JPEG or PNG).
Writing a subset map onto an existing map could cause problems because the maps might use different directory names. To try and alleviate the latter difficulty the stub for directories is taken from any existing subdirectories, or if none then the name of the target parent folder (the map name) is used.
A subset map can then be used as a source or target for any of the operations described above, just like any other map.
You can also create a subset map from a current view; see Using map tools for details.
Areas can be saved to or loaded from GPX files:
To save an area definition right-click on the area border and select Save area to GPX file on the pop-up menu (this includes properties, including colour and aspect ratio). Alternatively, all marks (including all areas) can be saved using the Marks → Save marks to GPX file menu item (or press the ‘s’ key).
To load a GPX file, use the Marks → Load marks from GPX file menu item (or press the ‘L’ key). This will open a dialog which you can use to select the GPX file to open. Any marks (tracks, routes, waypoints, images, and areas) in the file will then immediately be shown on the map (you may have to zoom or change the map, or move it, for the marks to be in view).
Depending on the source of the GPX file, areas may have a default (red/orange) colour or may have a colour that was set later.
If an area has been loaded from a GPX file it can be adjusted as described above (it is initially ‘locked in position’ to prevent accidental relocation; use the area’s pop-up menu and select Allow dragging to unlock the area). At any time you can reset an area loaded from a GPX file to its original data by right-clicking on the area border and selecting Reset area.
To delete an area, right-click on the area border and select Delete area on the pop-up menu.

