PanGazer – saving images
PanGazer lets you save the current image file. To do this, you can either:
- select the Image → Save image menu item (or press ‘Ctrl-s’): this will replace the current image file with the current image and changes (the menu item will be inactive if no changes have been made since the image was loaded or last saved).
- select the Image → Save image as ... menu item: this will open the Windows file save dialog box for saving the image.
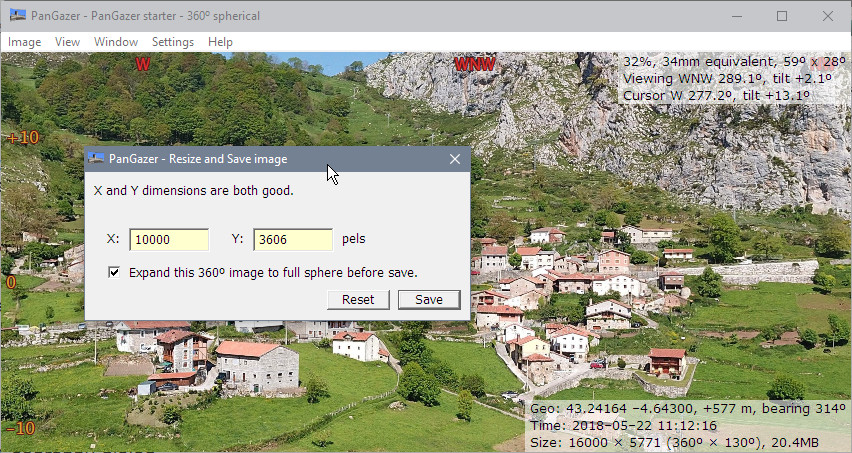
- select the Image → Resize image and save as ... menu item (or press ‘Ctrl-r’): this will first open a PanGazer dialog box (see below) that lets you change the size of the image before saving and also lets you expand a part-spherical panorama to a full sphere. Full spheres are required for some sharing platforms; see Sharing images for more details. After saving, the new image will be shown in a new View window so you can check it.
In all cases, the image is written to the selected file as a JFIF (JPEG File Interchange Format) file with extension .jpg or .jpeg, including the Exif (Exchangeable image file) metadata, XMP (Extensible Metadata Platform) metadata, and any other metadata that was loaded for the current image. The Exif and XMP metadata might be updated or replaced, as detailed below. Note that if the image being saved is spherical then new XMP metadata are always written; in this case the XMP metadata requires a North value (see the Setting North page) so, if North has not been set explicitly, PanGazer will set North at the centre of the image in the XMP metadata (but will not assume that value for North when next loading the saved image).
In addition, 360° images will, by default, be saved with the centre (left↔right) of the image matching the centre of the view at the time of the save. This gives a better result with some viewing platforms and also improves the image when viewed with a non-360° viewer. You can switch this behaviour using the Settings → Image load and save → Save 360° images rotated to view menu item.
If the original image was not a JPEG image or if the image had to be re-compressed for any reason then a JPEG Quality of 90% is used.
The PanGazer ‘Resize and Save image’ dialog box
Here is a screenshot of the PanGazer Resize and Save image dialog for a part-spherical image (for non-spherical images, or full-sphere images, the line with the checkbox is replaced by a description of the image type):
In detail:
- You can adjust the size of the image by editing either the
X: or Y: values (PanGazer will update the other to maintain
the same aspect ratio, if the new value is valid). You can reset
the X and Y values to those of the current image by clicking the
Reset button.
Note that if the image will be a full-sphere panorama then the X value must be even (so that the Y value can be exactly half that).
- You can convert the image to a full sphere if it is a part-spherical
panorama (e.g., an image that was created from drone photographs
that had limited coverage above the horizon, such as the PanGazer
‘starter image’). To do this, check the Expand this 360°
image to full sphere before save checkbox (this will be checked
by default for a part-spherical image).
PanGazer will then create a new image and fill in any missing data above the top edge (and also one column of data if the X dimension is odd) using deterministic interpolation and smoothing to reduce sharp edges and generally improve the visual appearance.
Converting to a full sphere is necessary for applications and platforms that require that 360° images are ‘full spheres’ (that is, the image has data from 90° below to 90° above the horizon); see Sharing Images for more details.
- If you make no changes to the input fields and uncheck the checkbox then the image will be saved as-is, with updated metadata if you have changed the view, image geography, etc. (that is, as though Save image as ... had been used).
Having made any desired changes, click the Save button. This will create a resized and expanded image, if necessary (this may take a few seconds), and will then open the Windows file save dialog box for saving the image.
If any changes to the image size were made:
- The saved image is opened in a new window so you can check it (and, perhaps, adjust the viewpoint or other information and re-save it)
- PanGazer cannot simply duplicate the original Exif and XMP metadata. Instead, values you have set are included or updated, along with selected “well-known” values copied from the image’s Exif metadata. If the image is spherical then new XMP metadata matching the new image are also included. See the saved metadata page for details.
Note: the final view angles and zoom are saved as local persistent data when PanGazer is closed, and those saved values will be used when PanGazer is next started and will override values from the Exif or XMP metadata. The initial view values from the XMP metadata are, therefore, only used when the image was not the last image viewed using PanGazer, or if you select the Reset viewpoint menu item from the View menu or from the pop-up menu, or you press the ‘r’ key.
