More pictures
Timeline & people
Documentation
Firmware
Schematics
Specifications
Emulator Overview
Using the Monitor
Emulator Menus
Mini-Debugger
 These pages describe the Emulator for the Acorn 6502
Microcomputer Kit.
These pages describe the Emulator for the Acorn 6502
Microcomputer Kit.
Here you will find:
- An Introduction to the emulator
- Downloading (requirements, etc.)
- Getting started
- A brief Guide to using the Acorn Monitor
- A description of the Menu options
- A guide for the mini-debugger
- Differences from the real machine.
If you discover any problems with the Emulator, please send me e-mail describing the problem.
Introduction
The Acorn System 1 Emulator is a program which runs under Windows and emulates the hardware of the real micro-computer. Part of the Emulator mimics the function of the 6502 processor and its associated integrated circuits (the RAM-I/O chip, and the RAM and ROM), and the remainder provides the user interface, which simulates the LED display, the keyboard, and the tape cassette interface.
The Emulator runs the original Acorn monitor program, and so allows the development of programs exactly as on the original machine. The intent is to preserve the general look and feel (and sound) of the original, while making it available to many more people than have the actual hardware. The Acorn design is an excellent platform for learning the basic concepts of computers and the skills necessary to program a computer using machine code.
In addition to the functions of the original Acorn kit, the Emulator provides:
-
Simulation of a cassette recorder using
MIDI files (so you can
‘store to tape’ and ‘load to tape’
in real time, just as on the real hardware). Audio
feedback during record and playback is provided. The MIDI
files can also be played with the Windows Media Player,
QuickTime, etc.
-
Save As and Load options, which let you save RAM (or ROM)
to a file or load a program into the RAM (or ROM), using
a readable ASCII format. The Intel Hexadecimal Object
File format is used (as produced by
TASM and
other assemblers).
- A mini-debugger, for use when the processor is halted. This works in a similar manner as the original Acorn Monitor itself, but also allows single-stepping through a program so the registers can be watched (this makes it possible to develop and debug alternative monitors, and also see how individual instructions affect the internal state of the processor).
Downloading the Emulator
The Emulator is a program for Windows and should run on Windows 95 or any later version (it has only been tested on Windows 98 and Windows 2000, however – please let me know of any problems on other versions). A 32MHz or faster processor is required.
My employer, IBM, has kindly given me permission to make the Emulator for the Acorn 6502 Microcomputer Kit available on this website. The Emulator software is distributed free of charge under the conditions of the IBM Employee-Written Software program. If you download or use the Emulator you agree to the terms in the IBM License Agreement for Employee-Written Software. Please read it before downloading.
Download the acornEmulator.zip file from this link. The zip file contains two files, the acornEmulator.exe program and IBMlicense.txt (which must always accompany the program).
Unzip the zipfile into a known location and then start the program from a command line or by clicking its icon from an Explorer Window. You can create a shortcut icon for it on your desktop by right-clicking on its icon and using Send To > Desktop.
Getting Started
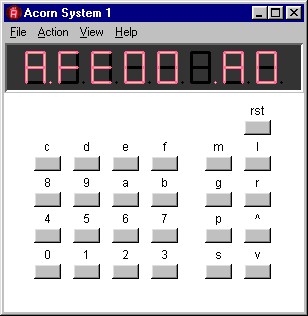
On starting the emulator for the first time, you should see a window with a menu bar and a representation of the Acorn LED display and keyboard. (The display is relatively large, to make it more readable, but the buttons and labels are laid out as on the real Acorn keyboard and to scale within the window.) You can change the size of the window by pressing the + or - keys to increase or decrease the size. Alternatively, you can drag its width with the mouse; the window will then ‘snap’ to the largest size which will fit in that width.
On startup, the emulator is in the same state as the real hardware after power has been switched on. The ROM is loaded with the monitor, RAM has random values, the RAM-I/O outputs are all high, and the processor is halted. All display digits (simulated LEDs) should therefore be dark, except the right-hand digit which should have all its segments lit.
To start the monitor running, click on the rst (reset) button on the Acorn keyboard, or press the Escape (Esc) key on your PC keyboard. You should then see the initial pattern (eight dots) displayed by the monitor.
For further information on using the monitor, see the guide for Using the Acorn Monitor.
The emulator stores various information (such as screen position and size) in a file called as1.ini, which is placed in the same directory as the program file.
Differences
The most obvious difference from the real machine is the LED display area, which is presented using a scaled font instead of attempting to mimic the appearance of the real ‘calculator’ display, which looks like this:
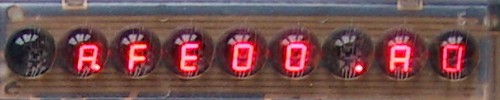
There are some more subtle differences, however:
-
The real machine will attempt to execute all operation codes
(opcodes), including those which are invalid or undocumented.
In contrast, the emulator currently only emulates those
opcodes documented in the original 6502 data sheets. If any
other opcode is encountered, the emulation is halted.
The mini-debugger then
lets you determine the previous instruction executed (often a
branch).
-
The Windows timer used by the emulator has a resolution of one
millisecond (1ms). The emulator uses this to ensure that the
emulation runs no faster, on average, than the original 6502
machine. However, timing loops which are shorter than 1ms can
complete in a very much shorter length of time, depending on
the speed of the PC running the emulation. (A 800MHz PC could
run the emulation at about 16 million 6502 clock cycles per
second.)
-
As Windows is a multi-tasking system, other tasks may prevent
the emulator completing 1000 clock cycles in 1ms; in this case
the emulator may appear to ‘lose time’. (This
restriction may be lifted later.)
-
In the real machine, component savings are made by allowing
the RAM, ROM, and I/O devices to be mapped to several
addresses (that is, each device may ‘appear’ at more
than one address). In the emulation, each appears only once
(RAM at pages $00-$03, ROM at pages $FE-$FF, and the RAM I/O
chips at $0E and $0F). Please let me know if you have a
program which needs this restriction removed.
- Emulation of the 6502 is temporarily halted while the bounds of the emulation window are being changed (otherwise Windows 98 hangs).