Using marks:
Waypoints
Tracks
Routes
Areas
Images
Scales
Mark properties
A waypoint is a position on the surface of the earth, which MapGazer can display on maps as a simple ‘X’ mark, a dot, or as an icon (see screenshots). Waypoints can be recorded by any smartphone with a GPS (Global Positioning System) receiver or by other GPS devices, or can be created using MapGazer or another application. Waypoints are saved in GPX (Global Positions eXchange format) files.
To load a GPX file, use the Marks → Load marks from GPX file menu item (or press the ‘L’ key). This will open a dialog which you can use to select the GPX file to open. Any marks (tracks, routes, waypoints, etc.) in the file will then immediately be shown on the map (MapGazer will adjust the map view to the centre of the marks, but you may have to change or zoom the map, or move it, for the marks to be in view).
Depending on the source of the GPX file, waypoints may have a default (brown) colour or may have a colour that was selected when it was recorded, and will use a default icon unless otherwise specified.
A waypoint loaded from a file is initially ‘locked in position’ to prevent accidental relocation; use its pop-up menu and select Allow dragging to unlock waypoint.
To create a waypoint, right-click on the map where you want to position the waypoint and select Add new waypoint from the pop-up menu. This will show the new waypoint icon and also open a Properties dialog which you can use to set its name, icon, colour, etc. You can adjust (left-click and drag) the position of a waypoint while the dialog is displayed.
You can also create a waypoint at the centre of the view, using Marks → Add new waypoint at centre (or press the ‘w’ key).
To move a waypoint, left-click on it and drag it to a new position. A waypoint loaded from GPX can be reset (reloaded from the original GPX data) by right-clicking on the waypoint and selecting Reset waypoint on the pop-up menu.
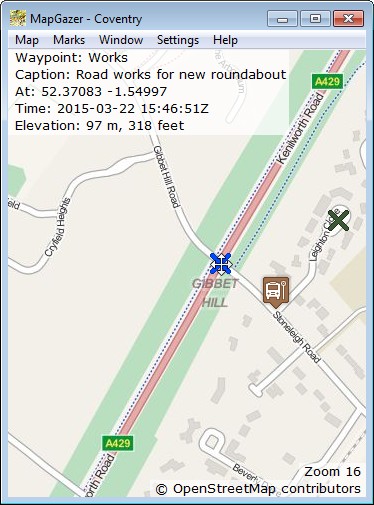
To see waypoint status move the mouse cursor over a waypoint; in the screenshot at right the cursor is over the blue waypoint.
The status that will be shown (unless turned off – see Settings) at the top left of the map includes:
- the name and caption of the waypoint (if available)
- the name of any icon assigned to the waypoint (if visible)
- any web link associated with the waypoint
- the date and time of the waypoint (in UTC, indicated by the Z at the end of the time), if the waypoint was recorded
- the latitude and longitude of the waypoint
- (optionally) its elevation, if recorded.
You can also copy details to the clipboard, for use by another application, by right-clicking on the waypoint and selecting the Waypoint details item on the pop-up menu; this will display a dialog with the strings that can be copied.
To change the format used for Latitude and Longitude, select Settings → Position formats on the menu bar; see the General settings page for details.
To save a waypoint right-click on the waypoint and select Save waypoint to GPX file on the pop-up menu to save the waypoint as a GPX file. Alternatively, all marks (including all waypoints) can be saved using the Marks → Save marks to GPX file menu item (or press the ‘s’ key).
You can change the displayed style (icon, ‘X’, or dot, and the size and width of waypoints drawn as an ‘X’ or dot) using Settings → Waypoints style and Settings → Line widths.
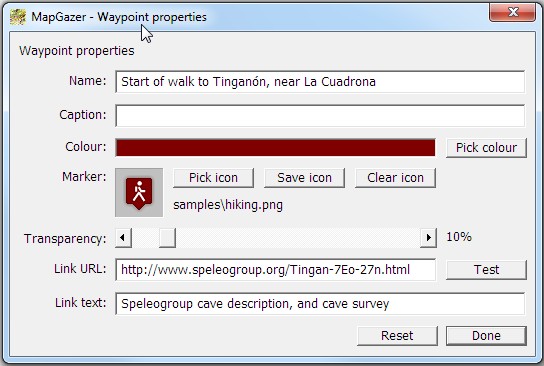
You can change the properties (name, colour, icon, link URL, etc.) of a waypoint by right-clicking on the waypoint and selecting Waypoint properties. As well as the properties that apply to all marks (name, colour, etc.) you can select an icon to use for the mark and if you wish (perhaps after changing its colour) you can save any icon.
The Clear icon button removes the icon so that by default the waypoint will be dispayed as an ‘X’. For more details, see Mark properties. See the screenshot of the properties dialog for the Waypoint at right, showing the various editable fields and buttons.
To see an aerial view of a waypoint’s location, right-click on the waypoint and select Browse satellite view; this currently opens Google Maps with a ‘pushpin’ shown at the waypoint.
To delete a waypoint, right-click on the waypoint and select Delete waypoint. This does not affect the GPX file from which the waypoint was loaded but the waypoint will not be included in a Save.
Here is a screenshot of a map showing a track and associated waypoints (with variously-coloured icons):

